Assigning Data to a Multi Bitmap Field
Note: Not all versions have the Multi Bitmap Feature.
To assign data to a Multi Bitmap holder, click on the desired rectangle with the left mouse button and complete the pop-up dialog which appears.
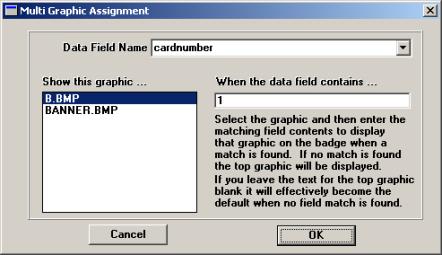
The process of assigning multi bitmap data to the holder requires you to match data from a field in the database to the pre-defined bitmap graphics. The suggested steps for assigning data are as follows:
1. In the Date Field Name drop down menu, select the database field that contains the data you wish to use to determine the graphic to display
2. In the Show this graphic … list, select the graphic that you wish to enter criteria for showing
3. In the When the data field contains … text box, enter the data which, when matched, causes the selected bitmap to appear.
Repeat this process for as many graphics as are in the list. If you leave the When the data field contains … box blank for the top graphic entry, that graphic will effectively become the default. As such, it will be displayed on the badge any time the data in the selected database field matches none of the entered criteria.
NOTE
The use of the Multi Bitmap function can be made
even more powerful when combined with the use of the Data Presets. The
presets can be defined whenever a Badge Database is open by going to Configuration – Set Data Entry
Control. For more
information on how this is done, see Setting the
Auto Fill In, Locked, Hidden, Alarm and Preset Fields.