Using the Snap Feature
The Snap feature is a tool to simplify the alignment and sizing of data holders. When selected, the object or object edge being moved will only be positioned at locations which are an exact multiple of the snap value set for that axis.
To use the snap feature, first select the menu item Design, Set Snap. This will open a dialog like this:
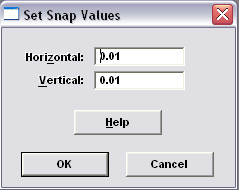
A snap value for each axis can be entered. If the current units are inches, then snap values down to 0.1” can be entered. In metric the minimum snap value is 1mm. A different snap value for the horizontal and vertical axis can be entered if desired, but usually the same value for each will be entered. If a non-zero value for at least one axis is entered, the Snap feature will automatically be activated.
If a snap value has already been entered, the Snap feature can be turned on and off by selecting the menu item Design, Snap. When checked, the feature is active.
The Snap feature can be likened to an invisible grid laid over the badge design. The grid spacing is set by the horizontal and vertical snap values. As a data holder is moved, the top left corner of the rectangle can only go to intersection points on the grid. Similarly, if the right side of a data holder is dragged to resize the rectangle, the edge can only rest on a vertical grid line. This makes it very easy to position and size data holders so that they line up and are the same height and width.
Note that the Snap feature does not affect rectangles moved by the four arrow keys on the keyboard.