Fast Find
The Fast
Find feature is provided to allow a simple and quick select of a
badge or badges from the database. It is
limited in capability and should be used when the search criteria is
straight-forward. If you click on the  tool bar button, or select Search, Fast Find from the menu, the
following dialog will appear:
tool bar button, or select Search, Fast Find from the menu, the
following dialog will appear:
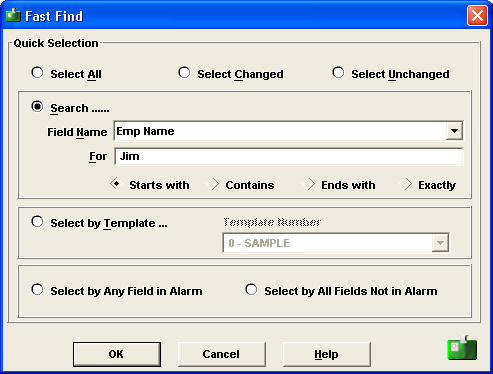
When the dialog first opens, the Search .... radio button is selected. The field to be searched is set from the pulldown box labeled Field Name. The actual text or number to search for is entered into the For box. When all data is correct, select OK to perform the search.
The way the program handles data entered in the For box depends upon the type of field it is being applied to. This is different for alphanumeric and numeric fields.
If the field type is alphanumeric and uses the General format, the program looks for a match for the given characters. You can choose how the search is conducted by selecting one of the four search options. The comparison is not case sensitive. The four options are:
1. Starts With will match only if the field data starts with the given characters.
2. Contains will match if the field data contains the given characters anywhere, including at the beginning or end.
3. Ends With will match only if the field data ends with the given characters.
4. Exactly will match only if the field data exactly matches the given characters.
As a result, if the text in the For box is “Bert” and you select Contains, the badges containing “Bert Smith”, “Robert Jones” and “Jill Robertson” will all be selected. You can move between the selected badges using the normal arrow tool bar buttons. Text searches actually use the Like comparison method, so the characters % and _ have special significance. For a full discussion on how to use these characters please see The “like” Criteria.
If the field has the Date, Time or Timestamp format, then the entry field will contain a preformatted field. For more information on how to enter dates and times see Date, Time and Timestamp Fields. The search is for exact matches only. See Searching for Times and Dates for some special information on searching for dates and times.
If the field type is numeric, you will only be able to enter numbers, a decimal point, and a minus sign (as the first character only). If the For field already contains text when a numeric type field is selected, the box will be cleared. The comparison is for exact equality only. Remember that numeric fields may be set for fixed length with a leading fill character. Search only for the variable part of the field. The fixed part is not stored as part of the data.
The field name and entered text will be remembered between each invocation of the Fast Find dialog.
The Fast Find dialog also includes buttons to allow selecting on the Changed flag either being set or cleared. The Changed flag is set whenever a change is made to badge data and is cleared whenever it is printed. These buttons are only available if the database supported multiple templates. Click on Select Changed to select all those badges which have changed since they were last printer, or have never been printed. Click on Select Unchanged for those badges which have been printed and their data has not changed.
The radio buttons marked Select by Any Field in Alarm and Select by All Fields not in Alarm allow you to select those badges which have time, date or timestamp fields which have alarms enabled, based upon whether or not an alarm is in effect. To find out more about setting alarms see Setting the Auto Fill In, Locked, Hidden, Alarm and Preset Fields in the Design Section. Note: this feature may not be enabled in all versions of the program.
At the bottom of the dialog is a button to allow selection by template number. This can be useful, for example, when you wish to select only those badges assigned to a particular template number for printing. This button is only available if the database supported multiple templates.
After the search results are finished with, all badges can be selected by reopening the dialog and selecting the Select All radio button. When you select OK, all badges will be selected.