Photograph
When Photograph is selected the area to the right displays nothing when editing a card template, or various parameters when revising a badge layout within a database. The Position area contains a button labeled Photo Size which automatically fills in the X Size and Y Size for a standard photograph of 1”(25.4mm)x1.25”(31.8mm) size. When the area does show it might look like this:
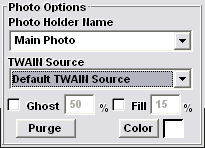
An unlimited number of photograph holders can be added to the design and they can all point to the same picture, or different pictures. When a template is designed, all photo holders are assigned to the default name of “Main Photo”. The rectangles can be given a specific name once the template has been assigned to a database. By using the Revise Badge Layout command, the photo holders can be given any meaningful name you wish. If no name is given, then the default is provided automatically. The Purge button allows all unused names to be removed from the list. Once named, a list of names is displayed whenever a photo image is captured to allow selection of the photo rectangle the image is intended for.
The significance of naming photo holders can be difficult to grasp, so here is an example. Let us say that a badge for a young student will contain 3 captured photographs. There will be a full facial view of the child, a picture of the student’s parent and a photo replica of the parent’s signature captured from a form. The child’s photo will be assigned to the ‘Main Photo” holder. The second holder will be renamed “Parent” and the third, “Signature”. Now when capturing photographs, with the student before the camera, the user selects “Main Photo” and takes the picture. When the parent is being photographed, the photo rectangle called “Parent” is selected. Finally, when the parent’s signature is to be scanned by a TWAIN compliant scanner, it is assigned to the “Signature” rectangle.
The meaningful names in this example help to simplify the decision about where to save the photo. It would have even been possible to rename the student rectangle to “Student” and not used the “Main Photo” name at all. However, sometimes other programs which share data with this program expect the main photograph to be stored in the “.~~~” directory. However, all renamed photo holders save their photo files in subdirectories off this directory. If this is not an issue, then by all means use another name for the main photograph.
The TWAIN Source pull-down allows you to either use the default TWAIN device to capture a photo for this rectangle, or specifically specify which TWAIN device to use. If you select Default TWAIN Source, then whichever TWAIN source is currently selected by the Configuration, Select Source… menu item will be used. But if you pick a specific TWAIN source, then that will be used regardless of the default selection. This would allow you to use the default TWAIN device for photo capture for a main photo rectangles, but specifically define another TWAIN device (such as a scanner) for capturing images to a secondary photo rectangle.
There are 2 check boxes that provide special manipulation of the photograph. The first is marked GHOST and has a percentage value associated with it. A photo holder which has ghosting checked will display the associated photograph in black and white. In addition, its contrast will be reduced by the percentage entered. At 100% a full contrast black and white photo will display. As the number is reduced towards zero the image will become lighter and lighter until at zero it will be invisible. Note that this does not change the actual photograph on disk, just the way it is displayed. You could easily display the same photograph on the badge twice, one with ghosting off and the other with it on.
The second check box is marked FILL and provides a means to remove the background from a photograph and replace it with a solid color. This feature is sometimes called Chroma Keying. This is a specialized function and only works effectively under the correct conditions. It is only designed to process "head and shoulder" type photographs. It works by calculating the average color of the top left and top right pixels in the photograph and then replacing all pixels in the photo background with the color selected as the background color for the rectangle. The percentage value determines how precisely the background color has to match the sample color developed from the top left and right pixels. The lower the number the closer the match before replacement occurs. To make this option work well, follow these few guides:
1. Use a photograph backdrop color radically different from any found on the subject.
2. Make sure the subject is evenly illuminated. This usually means at least 2 lights, one from the left and one from the right. This will ensure that the backdrop has a reasonable uniform and limited color range.
The color used as the replacement for the background is set by clicking the Color button. Note that under some circumstances the background will be colored using the nearest color available in the picture palette to the one selected. Usually the primary colors work best.
The FILL and GHOST buttons are mutually exclusive. Only one or the other or neither can be selected.
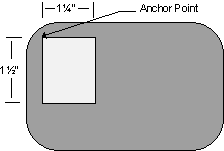
Unlike bitmaps, photographs will never be distorted to fit the assigned rectangle. Instead, they will be resized to fit as much of the rectangle as possible, without distortion. As with bitmaps, any border will automatically be taken into account. The “anchor point” will be the top left corner of the rectangle (even if inverted). Generally, you will establish a photograph rectangle first, and then the captured photographs will automatically be proportioned to fill the given space.
However, it is possible to change the badge layout at some time after photographs have been captured, and you may change the photograph rectangle so that it is not the same aspect ratio as before. In this case, new photographs will have the new aspect ratio and fill the assigned space. But old photographs will be enlarged or compressed to fill as much of the new rectangle shape as possible, without distorting, starting at the top left corner. Unused rectangle space at the bottom or right will not be visible, badge background showing through instead.
This is best clarified with an example. Let us say that you designed a badge with a 1”(25.4mm) square photograph box and took some photographs. Later you revise the badge layout and change the photograph rectangle to 1ј”(31.8mm) wide by 1Ѕ”(38.1mm) high and take some more photographs.
Badges with old photographs will have the square photograph enlarged to display as on the left and new photographs as on the right: